
Chronicles of prototyping - the R&D Lab
The first meeting was like any other. The client, a product designer, had received a development mandate for connected pot handles. The designer had immediately agreed, assuring the end customer, a professional kitchen machine manufacturer, that it was probably quite feasible.
We all sat down at that first meeting, our business manager, a hardware engineer, and me, to receive the designer's first requests. He pitches us on the project that will revolutionize the hotel industry in general by reducing "salary costs" by "tailoring the processes", and show us his first drawings. Here is the drawing of the future product with an ergonomic design that will be easily washed with the rest of the dishes, and will be able to work with a fleet of other handles, all connected to the Wifi network to centralize the data and make statistics. With my partner, we were confident at first, but nothing innovative at the technological level.


"My client wants 5 functional prototypes to send it for testing to his customers as soon as possible. To save you time, I will send you the 3D files of the box. For the rest, I leave it up to you.
After my boss took 20 minutes to explain that these things take time, he handed over to us. It was time for the engineers to ask questions to try and decode the specifications.
The conversational specifications entry
" - To set the alarms, you need an interface with buttons, right?
- Yes you can put two buttons directly on the circuit
- You put a screen, to display what exactly?"
- All the interesting data, a timer and the internal temperature for example. It will be defined after the first tests by the customer, and it would need a buzzer also for the alarms. I found a screen on Aliexpress that will do very well. I put the link in the file".
- how many db for the buzzer ?
- It is necessary that the cooks can hear it, with different melodies to differentiate between them.
- How much autonomy?
- I don't know, do your best, but it must be rechargeable
- rechargeable and waterproof?
- Yes, and it will need a charging station to recharge several at once. It needs an indicator for the level of charge. Red for "charging", green for "charged", but that's not the most important thing.
- Yes, we can discuss it again," the business manager cuts in before going on at length about our various past achievements, sprinkled with funny anecdotes. "We will probably be able to provide you with the first prototypes in 2 or 3 weeks."

Back at our offices, it was time to start.
" - We have to go fast guys, make me something we can test, I need you quickly to move forward on the Firmacom project!"
The Proof of concept
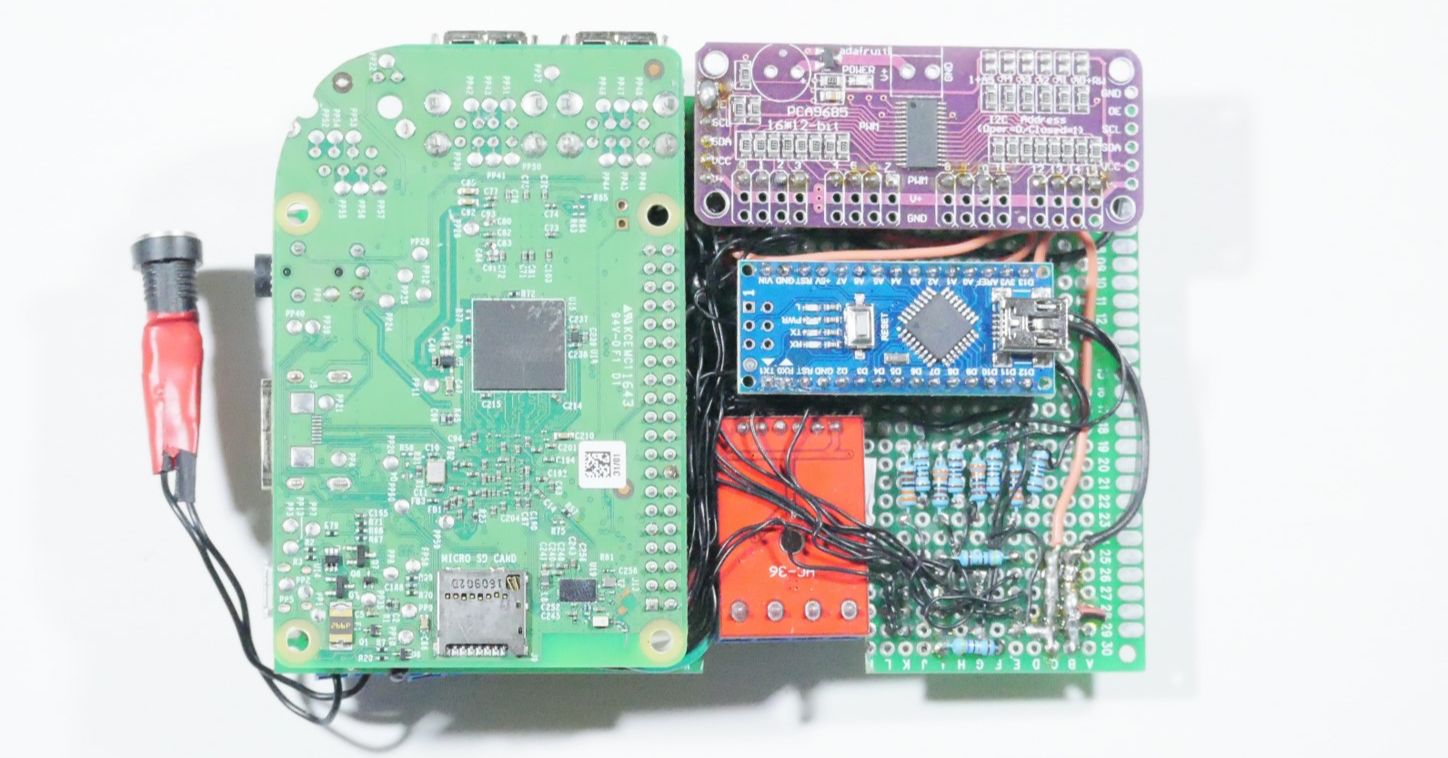
Easy. An Arduino, an esp-32 for the wifi, buzzer, the screen to be controlled in I2C that we had in stock, and two tactile buttons. A USB battery charger with a LiPo cell. We had often worked with these very standard elements. The I2C bus for the screen, the UART bus for the wifi. About twenty cables made the whole thing levitate in a rather fuzzy assembly. No problem. We went to buy a pan, cut out the handle, and taped the whole thing in place.
Our first goal: make a first "quick and dirty" prototype to start programming the system quickly and demonstrate fast progress. We directly reused some programming libraries found on the web and spent several days programming the required function: set the alarm and ring when the time is up. Send the logs via wifi.
During the first tests, the prototype sometimes showed erratic behavior and restarted, often after pressing one of the two buttons. We searched the code for a problem in the action lists and event management that could have led to a memory leak, or a miscalculation. Difficult to solve, as the debugging UART bus is already used by the Wifi communication. Two more days. Until one of us discovered, after an umpteenth check, that the tape created a short circuit when pulled in a certain direction, and that one of the small cables had been unsoldered. Easy to solve, difficult to assume.

Once finished and tested with the means at hand, we left this project aside to take care of other even more urgent projects.
On the meeting day, we bring the prototype, happy to make something that works well. The client reacts immediately.
"Is this the prototype? I don't think it's dishwasher-safe" his little smile immediately darkened the mood.
"It's just a proof of concept, the real PCB prototype will come later when we can validate together the general behavior of the system. Here is the demo the guys prepared for you."
The demo went well. We show how to set the time, generate different programs via wifi and check that the screen displays the time and that the buzzer plays different melodies depending on the selected cooking program.
The customer was reassured, and even excited to see that it worked as he had imagined.
"Beautiful! I don't see why this wouldn't work in the kitchen!"
We used to hear this phrase a lot, and it always presaged a very long story.
The first PCB
Back to work, we start by selecting the components one by one and reading the long pdf documentation. The buzzer worked well, we take the same one. The screen too. We draw the components on Altium and start making the first groups of components in the schematic. 4 days.
" - By the way, what do we do for the charger?" my colleague says to me, a little worried when it comes to designing the power supply stage.
I answer him that it doesn't seem too complicated and that I will make the PCB of the charging station directly at the same time as the box. There is only to reuse the component of the prototype, it has an output "CHARGING" which makes it possible to determine the state of the load. We will see this later.
We divide the work. My colleague finishes the schematic of the PCB corresponding to the first prototype in a few days, while I draw the board and the different components in 3D to prepare the layout and the integration in the case provided by the designer. The 3D file is already designed for mass production plastic injection, with a "free space" for the PCB. Mechanic design is my job, and that's what's interesting for the client, and his customers. As the electronics are not a great added value in the product, as is often the case in this kind of project, the look and the ergonomics come first. It is the case that constrains the shape of the PCB. We have to make a 'look-like' prototype that can be tested by the customer in real life. I draw the shape of the electronic board to be screwed into the case and place the interface components such as the buttons and the screen, adjusting the case as best as possible to remain waterproof and ergonomic. 3 days.
" - The LIPO battery will not withstand a dishwasher that goes up to 80°C
- This is fine-tuning, for the final prototype. If this is a real problem, we'll adjust it with another technology after the first tests. Try to insulate it from the outside in the meantime," my colleague reassures me.
I provide my colleague with drawings of the shape of the board, as well as the position of the main components. He finishes routing the components, exports the manufacturing files, and places orders with the various component suppliers and the PCB manufacturer.
The "should be easy" sided project
I switch to the charger. I don't have much time to spend on this sub-project. I start by drawing on Solidworks a nice charging station that can charge 10 handles simultaneously, with ergonomic holding clips, I quite like the result. A small hole for an RGB led next to each slot and spring contacts "pogo-pins" at the exact positions corresponding to the handles. I like the result. No time to prototype with Arduino, and then I already used the charging component in the last prototype which worked very well. The usual procedure for the drawing of the PCB, the same as for the handles. Nothing complicated but the work is quite long and redundant. I order the case in black SLS 3D printing and export the PCB manufacturing files. 7 days.
Three weeks later, all the components arrived. We assemble the PCBs using a reflow oven and tin paste, each component of the 5 prototypes is placed in the Brussels clamp. The first ignition tests reveal that 3 out of the 5 handles do not fully work. Everything has to be debugged with an oscilloscope and a multimeter. This is a long process. Sometimes we have to replace burnt components, check each soldering with a binocular magnifying glass, unsolder, re-solder, go through the documentation again.
The debugs show some design errors to be patched. The small copper tracks that generate errors must be cut and the components reconnected with very thin cables so as not to interfere with the integration in the case. This makes the prototype even more fragile, but it is the only way to repair existing prototypes so as not to have to redo a PCB version and wait another 2 weeks for production. The charging station and handles are repaired manually with sometimes complex bugs that take longer than expected. Deadlines cannot be pushed back. After 4 days, this project becomes relatively urgent.
The programming has to be redone for the most part, as the microcontroller is not from the same manufacturer and the Arduino interface is too limited for advanced prototypes. We use STM Cube to generate an advanced real-time state machine with FreeRTOS. 5 days. We extend the deadline by one week.
Despite the CE mark already on the boxes, the 3D-printed handles are not waterproof, some elements are misaligned, and buttons are sometimes difficult to operate. Nothing very serious, it can already be sent.
The prototypes are quickly tested and work as "expected" (the nuance will be important later). We write a user manual and ship the prototypes and the charging station.
A few weeks later, the customer came back with the prototypes.
The first customer feedback
" - There are a lot of problems, first of all, the customer destroyed two of them by cleaning them with cold water.
- The waterproof feature will only be done on the pre-production prototypes in injected plastic, the material is not the same, this is normal and was specified last time.
- mmmh... The buzzers are too weak, you can't hear them enough. The kitchens are already very noisy.
- We won't be able to do much better, we'll have to make a new PCB with a different design and maybe a different technology, or provide a waterproof buzzer but it will be more expensive and more complicated.
- Redoing prototypes again from the beginning?
- No, we have to readjust, but it will take several weeks to make the modified PCBs again
- We're in trouble, we'll go over budget... There's also a problem with the charger, there are false contacts, but that's the mechanics, we'll sort that out."
He points to one of the handles, charging on the station at the end of the table.
" - But look at this one for example, it's charged, the led is green, ok, I take it out, the led goes off, I reconnect the handle, the led lights up red, it's wrong because it's charged!"
He puts the handle back in its socket, the LED lights up red indeed. This is not normal. Silence. I think quickly and badly. I think of all the possible causes of the problem and I feel ashamed. I feel all the embarrassed looks of my teammates. After a minute, the LED lights up green.
" - It works!
- No, it should be green immediately, because the handle is charged. First, it's red. The customer complained that this has to be fixed because when connecting the handle, the first information given is wrong and the user thinks that the handle is discharged and therefore not available for service.
- This is because of the transient procedures, it takes a while to stabilize the battery voltage at the end of the charge cycle. This is inherent in the charging curve. The calculation of the values takes some time before it can be determined that the battery is charged. It's calculated internally from the charging component that indicates the state of the battery, I have no control over that, and if we need t...
- All I can see is that it doesn't work!
- Everything works as we presented it to you last time."
It took 3 months to develop the first accepted charger, in a permanent hurry.
Your place in the project
EBE needs to make friends in the real world
The squad is always looking for new talented partners to empower the project. Join FlecheTech in the nebula community and be part of the EBE project pionieers.